 Graphl Technologies
Twin Sync Studio
User Manual
First, please go watch the tutorial (below). It has nice chapters (in the description) for which the title may answer question like,
- "how do I do material mapping?"
- "how do I use it with the Movie RenderQueue?"
- "how can I use my custom unreal engine material?"
Please feel free to contact support with questions or clarifications about the contents of this, and we will try to adjust this manual correspondingly.
Downloading your data
iTwin
iTwin and iTwin-backed applications like Synchro are currently supported through either the iTwin login feature or .bim files. Please consult your application's documentation if you cannot find your iTwin from the download screen.
Synchro 4D
Synchro 4D Pro is itwin based, so you should be able to just go to the Download screen, find your project and download it. If you are using the standalone edition without providing your own iTwin developer license, you will not have the Download button on the main menu and will need to provide .bim files yourself.
You can also try to download a .bim file from Synchro 4D Pro. According to Synchro's 3D Model Interoperability documentation, you must have a Synchro 4D Pro license to use their .bim export.
The feature has been historically unstable, so please test it with the trial version to see if it works for you. It will also slowly convert the entire Synchro project to .bim from scratch, whereas loading an iTwin-native Synchro project will download only changes upon re-opening, which will be a faster experience each time you make changes in Synchro.
If you still want to download a *.bim from Synchro, do the following:
- You will need a Bentley account, internet access, and a Synchro 4D Pro license. The export will run in Bentley's cloud.
- Navigate to the
Export > 3Doption, and select the.bimformat. - Tweak the settings in the menu as you see fit and be sure to export animation if you want animation.

- You should now have a
.bimfile that you can open with Twin Sync Studio!
We do not currently support loading .sp files directly. This would require reverse-engineering the closed format which is prohibitively difficult. You must be using an iTwin-powered synchro offering like Synchro 4D to use it in Twin Sync Studio.
Other
Supporting other data sources where possible is under consideration and please feel free to contact support with any requests.
Access keys and seats
To install Twin Sync Studio, you will need an access key, available seats on that key, and an active subscription which may be purchased at our website.
Access keys are purchased with a seat count, and seats are allocated per machine. That means that once you install the software on one machine, that machine is now using a seat for that access key/account. If you need to move one of your seats from one machine to another, contact support. In the future, there will be a button in the application to deactivate the seat allocation of the current machine. You may only reallocate a seat allocation to another machine once per day.
System requirements
To use Twin Sync Studio, you will need at least:
- Windows 10 or 11. If you want to try alpha Linux support, please contact support.
- 16GB of CPU RAM
To use Twin Sync Studio-generated content for Unreal Engine, you will need:
- Unreal Engine 5.0-5.6 installed
- to meet or exceed Unreal Engine's system requirements
The more Graphics RAM you have in your GPU, the larger scenes you'll be able to handle. - Microsoft Visual Studio or just the Build Tools for visual Studio, with the Desktop C++ and .NET Desktop build tools workloads installed.
You can develop on the latest supported version of Unreal Engine for Windows (5.6 as of writing) without Visual Studio until you package your project, since we ship the necessary binaries for that version, but you must build the packaged version of the plugin yourself for your desired platforms.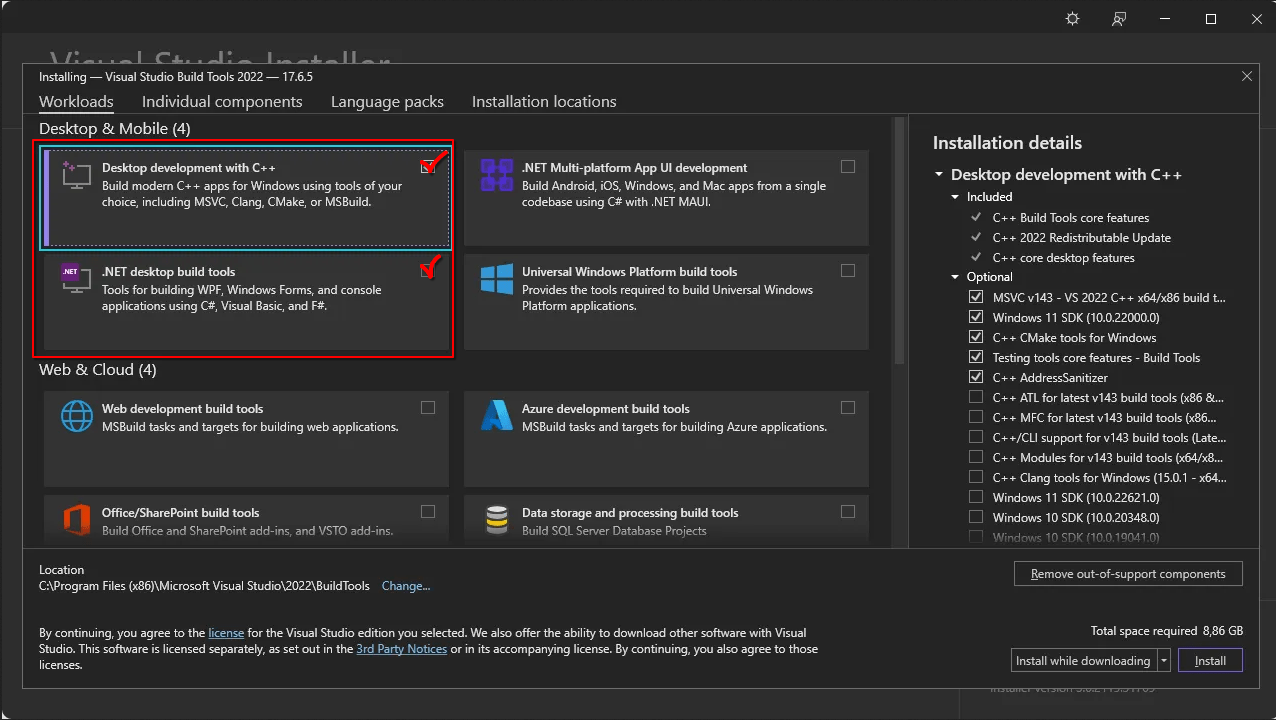
Installation
To install Twin Sync Studio, you will need:
- The downloaded installer
- An access key for an active subscription with at least one available seat
Both of the above should be delivered promptly to your registered email (within 2 business days) after payment is processed.
Once you have both, on Windows:
- Double click the downloaded installer
- If you are greeted by a blue "Windows protected your PC" window, hit the "more info" link and then the "run anyway" button.
Since Graphl Technologies LLC is a new company with a new code signing certificate, (April 2025), you may see this screen until the application has been downloaded many times. See this link for more details.
Regardless, always check that the installer was signed by Graphl Technologies LLC, as indicated by Windows as you run it. - Read through the End-User-License-Agreement, terms and conditions, and privacy policy.
- Press "accept and continue" if you agree and are ready to proceed.
- Type or paste your access key into the text input, and press "submit".
- If your license is valid (you have installed on this machine before or have unused installations on your license), then Twin Sync Studio should open! Of course, if it doesn't work, please contact support with the given error message.
Updates
As of today, application updates are announced on our LinkedIn pageand subscription holders will be notified of major updates and their changes via the email with which they subscribed. Installing an update currently is not automatic, and requires opting in by downloading the latest installer and running it. It will not delete your project data.
Main menu
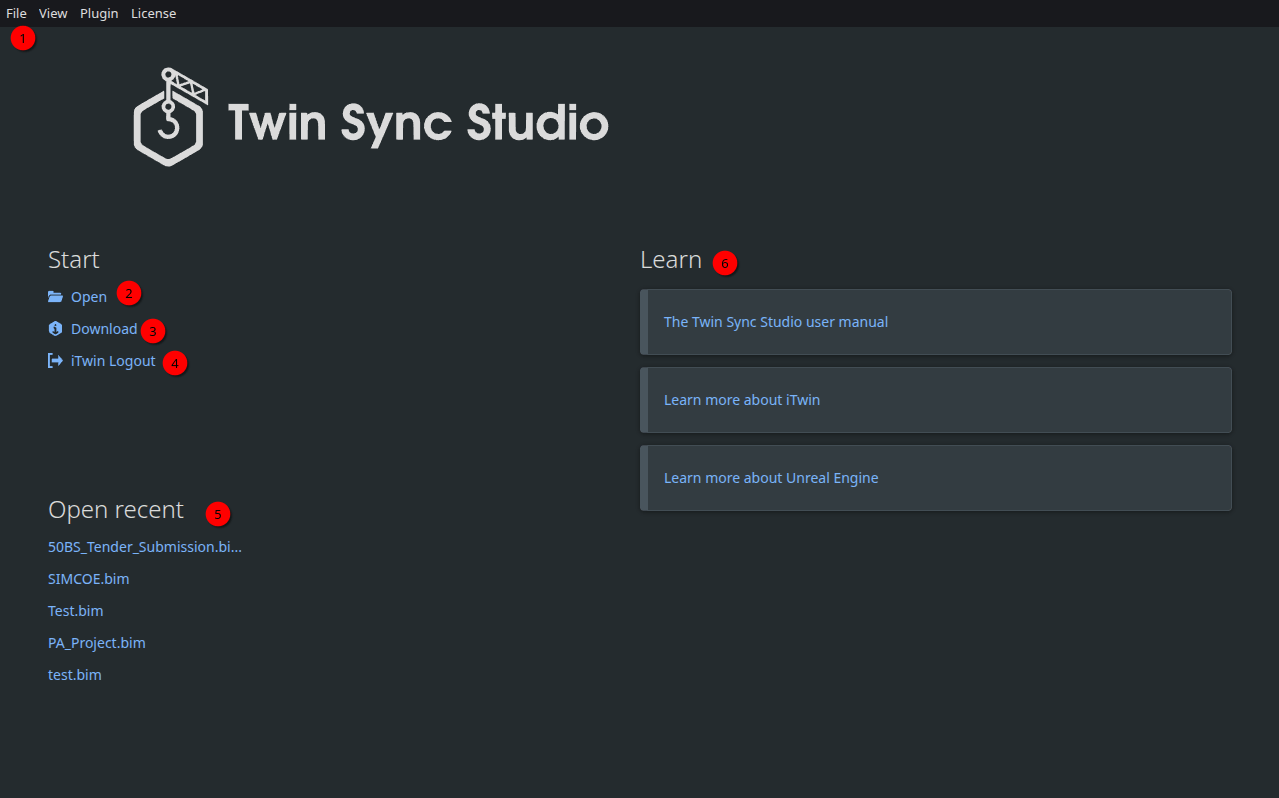
- From the
Fileandviewmenus, you can go back to the main menu or change which file you're inspecting at any time.
From thePluginmenu you can install the Unreal plugin, and from theLicensemenu you can revoke the current device's installation. - Open the export creation interface for a local file
- Open the iModel selection interface, where you can select an iModel from your Bentley account, such as a Synchro 4D project iModel, and then download it as a local file and open it. If you are using the standalone edition, and haven't provided your own iTwin developer license key, this button may be missing as a license is necessary.
- Logout of your Bentley account and purge any credentials saved in your computer's secure password storage
- Click a project name here to open the corresponding recently opened project
- Follow a quick link to learn more about some of the technologies in use
Export creation interface
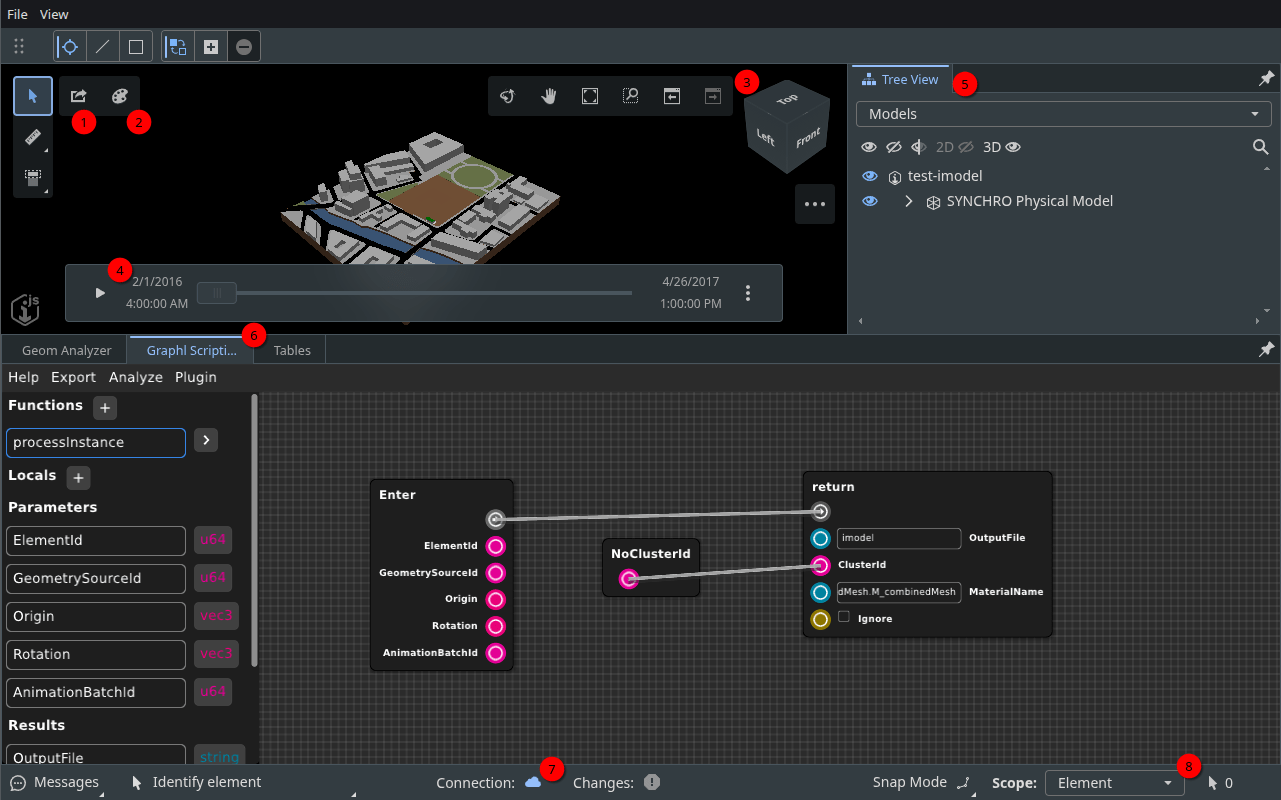
- Quick Export button. Brings up the quick export dialog
- Enable the Graphical complexity visualization overlay. This will color elements by how many vertices there are. Red elements are the densest in the scene, green are the least dense. Due to limitations of the iTwin viewer, it is inaccurate if one element contains multiple instances ("parts"), but otherwise is helpful to find problematic elements
You can disable the complexity view by clicking the Clear ... Emphasized button that appears next to it once the mode is enabled - View manipulation tools. Use the 3D cube, fit to view, pan, zoom, and other tool buttons to navigate the view
- Schedule playback bar. Play through and inspect the schedule in your iTwin. Only the first schedule found is shown
- Tree view. A common iTwin viewer component, you can inspect the model hierarchy and categories, and manipulate the visibility of their geometry in the viewport
- Widget tabs. Select between viewing the scripting interface, geometry analyzer, and table manager tabs.
- Connection status. Shows whether you have the latest synced changes to the iTwin and if you're connected to the iTwin services
- Choose the selection scope, if you want to select whole assemblies at a time instead of the default of individual elements
Quick export
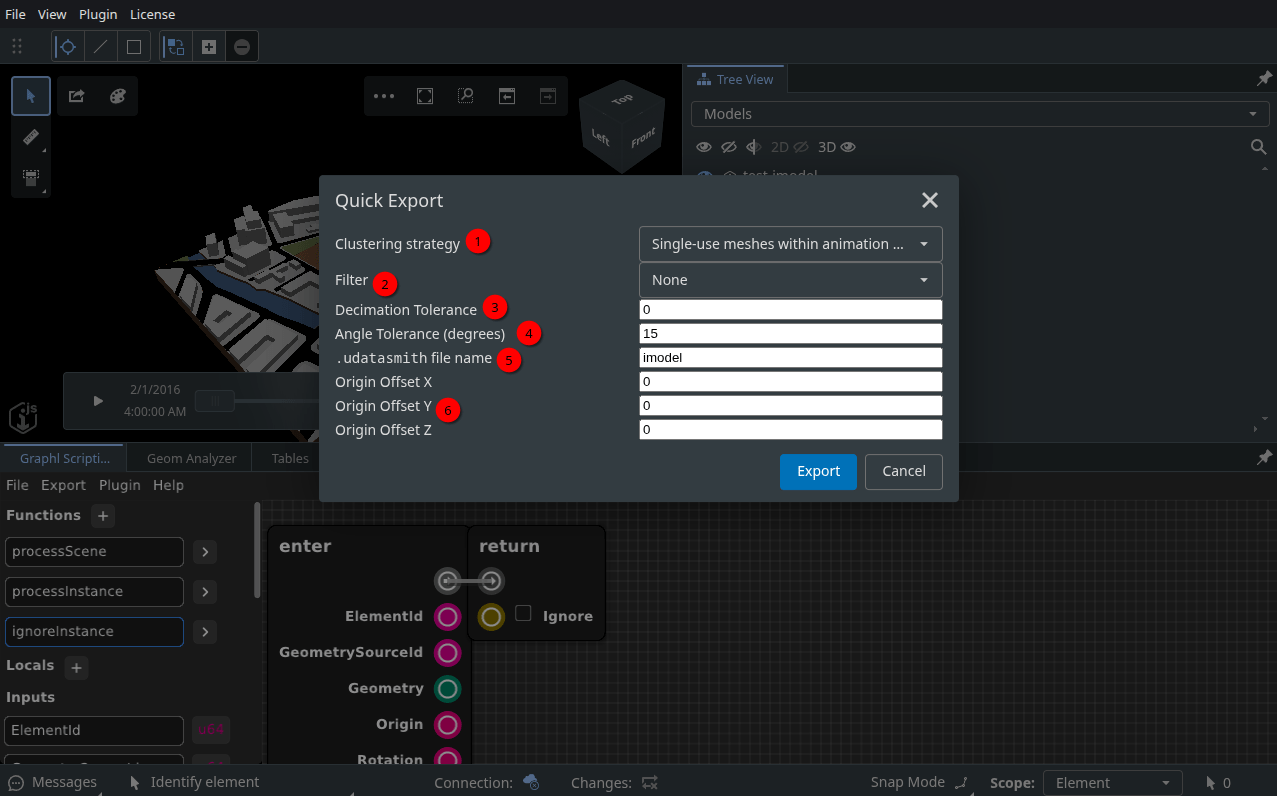
The quick export allows you to perform an export with some basic settings, completely ignoring the scripting interface. Hover over each option to see an explanation, reproduced here with more details.
Clustering strategy. Decide which iTwin scene elements to merge into a single actor in Unreal. Merging meshes means less draw calls which means faster real-time rendering (vroom vroom). Construction geometry however can be very heavy and repeat instance meshes, so you may reach Unreal Engine's 2GB static mesh size limit if you merge too much. This can usually be avoided by just not merging instanced meshes since those will take less memory as a single static mesh placed multiples time across multiple static mesh actors. That is why the default merging strategy is "Uninstanced elements within each element". So all pieces of an element get merged, except anything that has multiple instances. You may also try merging "All uninstanced meshes" or "Uninstanced meshes within each animation batch" for less draw calls.
In the scripting interface, you can assign meshes to merged clusters however you want, by just finding a number (such as the category id to merge by category) for each mesh.
- Filter. Choose either no filtering or filtering to only support selected, or only visible elements.
- Decimation tolerance. The distance in meters at which to merge vertices in the mesh. This can seriously lower the quality of meshes with hard edges as normals are not preserved. Can be useful to reduce the complexity of dense, smooth meshes, or easily remove very small features or duplicate vertices.
- Angle tolerance. Max angle difference in radians for approximated face. For example, a primitive representing a circle would have its 2 radians circumference divided by an angular tolerance of 0.25 radians, yeilding a mesh "circle" of 8 vertices, an octogon.
See the iTwin documentation for this. .udatasmithfile name. Set the name to use for the generated.udatasmithfile and_Assetsfolder. So a name of "myproject" would yield the filemyproject.udatasmithand foldermyproject_Assets.This is done because the scripting interface allows you to export to multiple separate datasmith files with different names, should you need it.
- Origin Offset. Defaults to offsetting everything to be in the center of the Unreal scene. You may specify your own if desired.,
Geometry analyzer
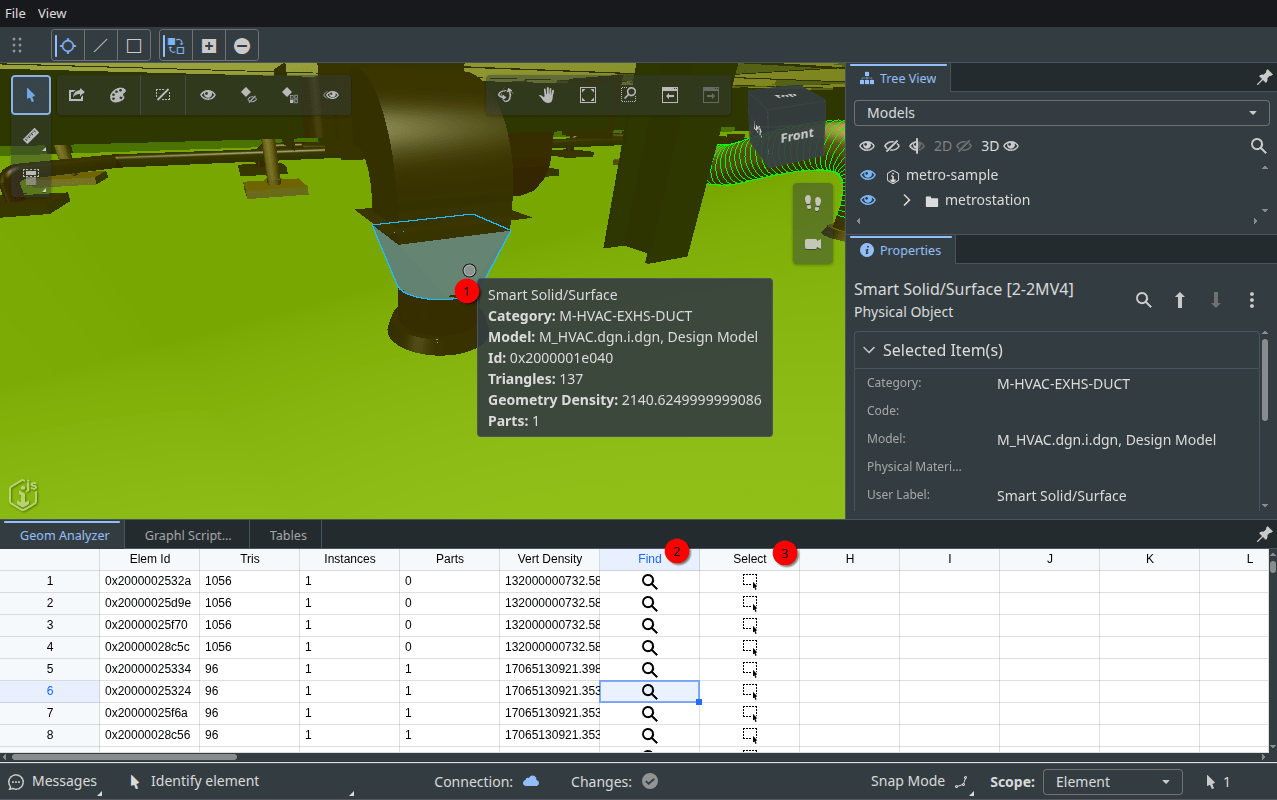
The geometry analyzer shows a table sorting elements by vertex density. In the presence of multiple instances ("parts") within one element, it may be slightly inaccurate, but this is a rare case.
- Hovering over an element will list similar geometry properties to those in the table, but for that specific hovered element.
Each element in the table and the hover panel show the amount of undecimated triangles it would produce during export, and how many instances there are of this particular mesh in the scene. Elements with more than one instance often should not be clustered for maximum performance. - Click on the search icon in the Find column to zoom to an element. If you've enabled the graphical complexity view, the densest elements at the top of the table will be in red.
- Click on the select icon in the Select column to add the element to your selection.
Table manager
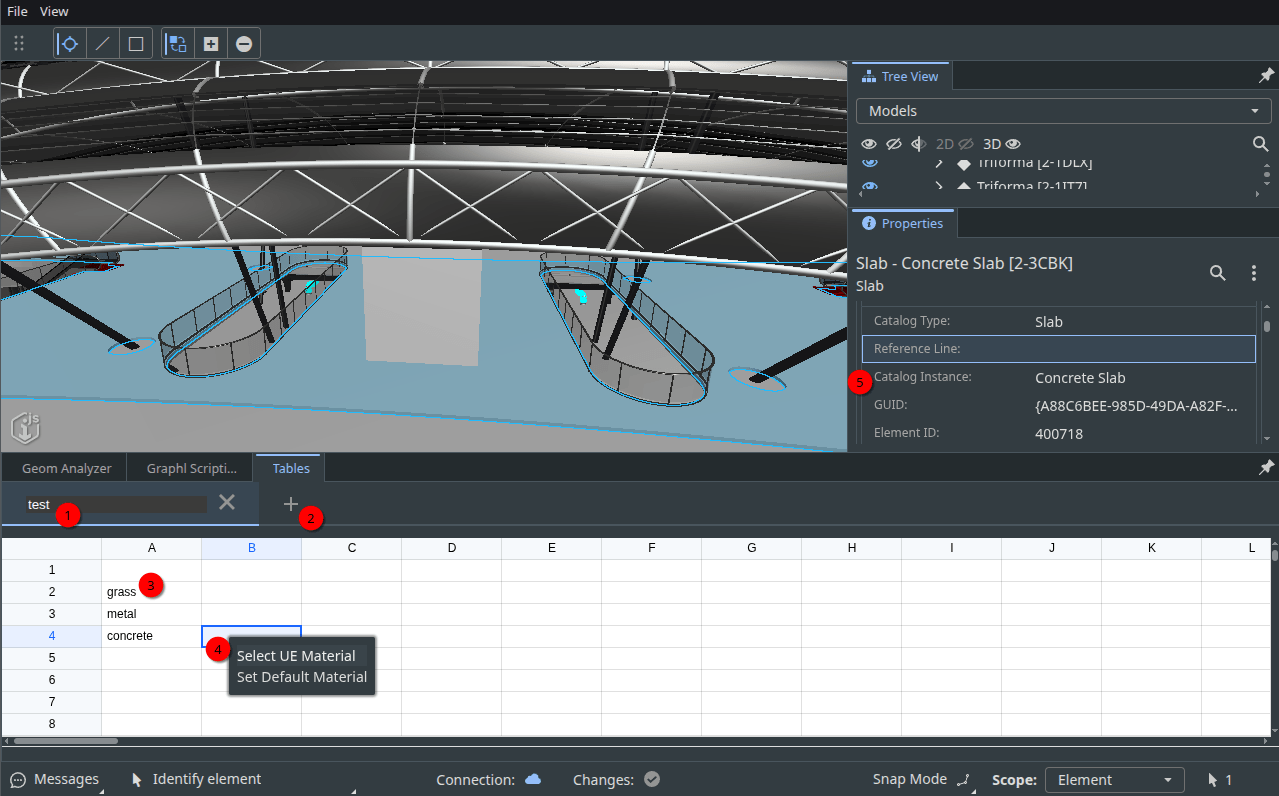
The table manager allows you to create tables for access in the scripting interface. Currently, the main use of tables is for creating a material mapping table for metadata in your iModel. You can also copy cells from most spreadsheet editors (for example, Excel), and paste them into this table view. It saves automatically each time you edit it and the data will be present if you close and reopen the project.
For more information on this workflow, see the corresponding tutorial.
- Click on the selected table's name to edit the name. You may delete a table with the x button, and switch to an unselected table by clicking on it.
- Press the + button to add a new table
- Select a cell with the left mouse button and then use the arrow keys or start typing to fill in table cells.
- Right click a cell for help entering special values. Currently supported are helpers to get material asset paths from your Unreal Engine project.
You can either input the "default" animated material from the plugin for that cell. Or you can select any material from your Unreal project by using the file browser. - You can see, for example, the property panel here, where you can inspect data in the iTwin coming through Synchro, Revit, or from wherever the data was synchronized. These properties can be accessed in the scripting interface to decide which table row to select a material from.
Graphl scripting interface
Twin Sync Studio's scripting interface is built on top of the Graphl scripting language, developed by Graphl Technologies. Note that Graphl is in alpha. Please report any encountered issues!
With Graphl, you can access all the data in your iTwin, using a convenient visual scripting interface, and even dropping down to JavaScript if you need it.
Graphl is designed to be familiar for users of other visual scripting tools, like Unreal Engine or Blender material and geometry nodes. If you would like a particular feature, please vote for it or add a feature request.
Visual scripting basics
In Twin Sync Studio, you are given a function processInstance which you may implement as you see fit. Given some inputs about an instance of the a geometric mesh in the scene, tell the exporter:
- which datasmith file to send it to
- which cluster to merge it into, where a cluster is identified by any non-negative number (the type is called u64)
- which material to assign it, the unreal engine asset path of said material
- or whether to just ignore it entirely while exporting
Here is some information to help get you oriented:
- The logic starts flowing from the "Enter" node, which also has all the inputs
- All paths must end in a "return" node for your visual code to be valid
- You can use the
ifnode to change what path is taken - Flow pins (the ones with arrows in them) control the "flow" of the code, and say which node to go to next
- If you have not seen them before, you may want to learn about integer, floating-point, and boolean types, which you may know from Unreal Engine's blueprint system and other programming languages
You can take the following actions to manipulate the node graph.
- left click and drag on a node to move it around
- left click and drag on the graph background to pan around the graph
- left click on a node to select only it
- hold down control and left click on a node to add it to the current selection
- left click and drag on a selected node to move the whole selection around
- use control-C to copy some nodes and their links to the clipboard
- use control-X to cut some nodes to the clipboard, deleting them after the copy
- use control-V to paste some nodes and their links from the clipboard
- right click a node for some options, such as to delete it or the whole selection
- right click the background to open the "add node menu". Then type to search for a node. Or use the arrow keys, tab, and enter to select a node type to spawn. Nodes are organized into categories
- click and drag from one colored input or output "pin" of a node to another node's pin to create a link between them
- click and drag from one colored input or output "pin" of a node and "drop" the dragged link to open the "add node menu" with a filter on the type of node you are trying to connect. Creating a node this way will autoconnect it to the first compatible argument
- control-click a pin to delete all of its connected links
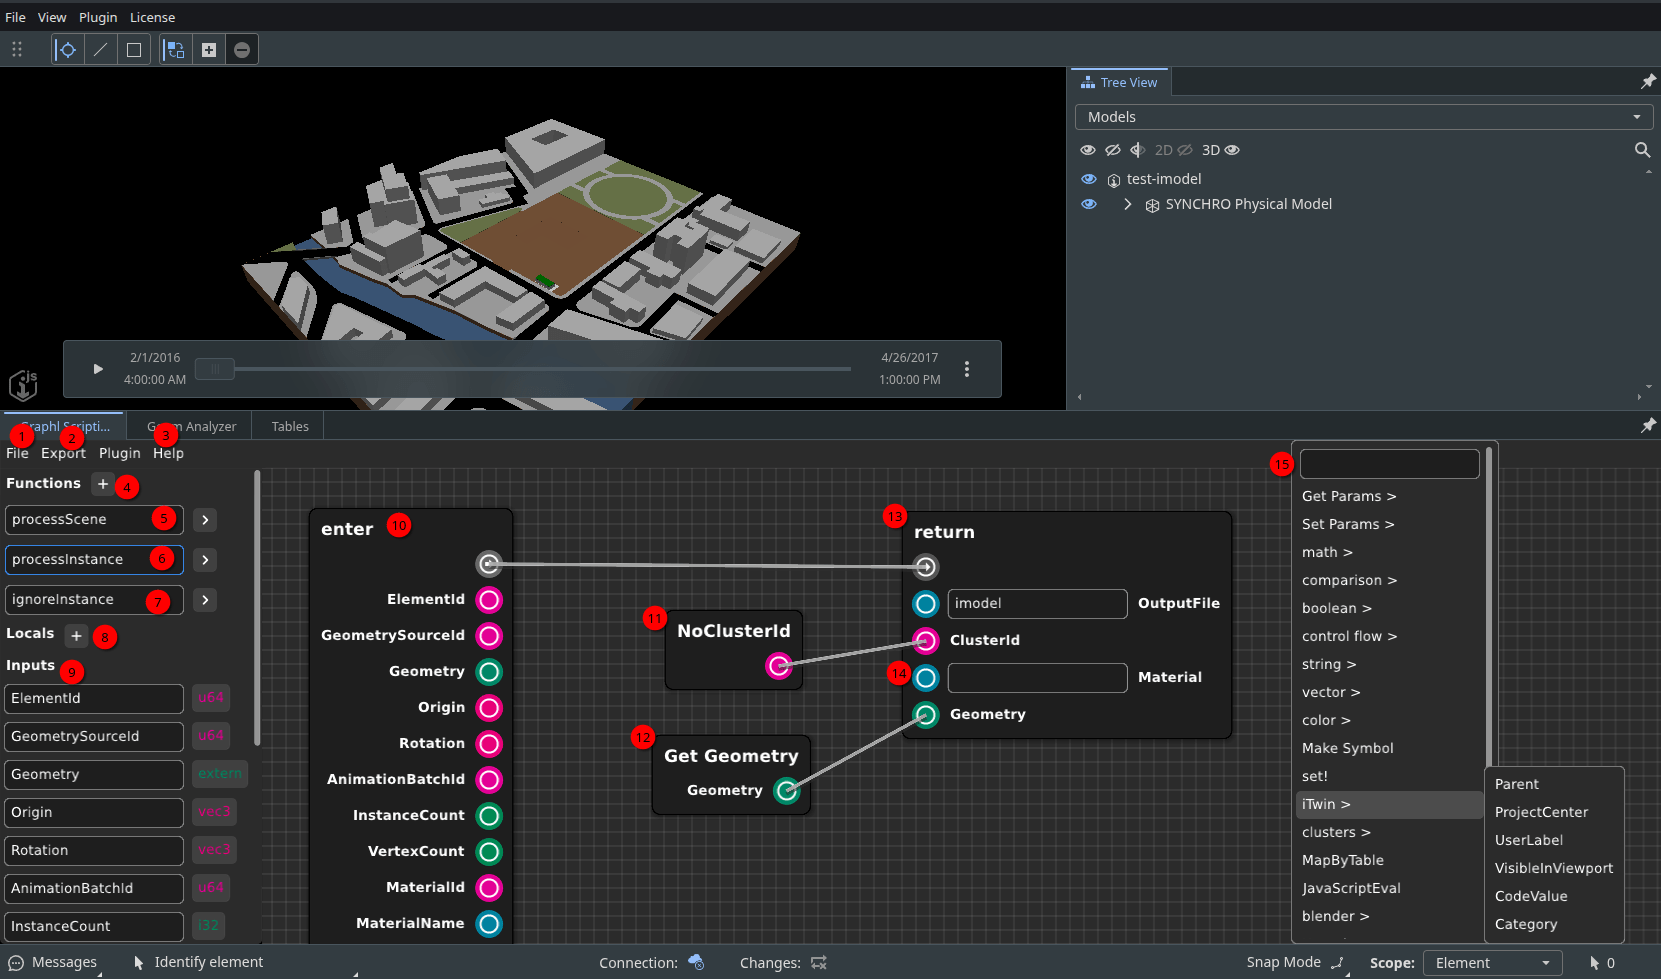
- File menu. You can use the "Save" and "Open" options to save your current script to a file or load an existing saved script
- Export menu. You can run the scripted export by choosing the export option
- Help menu. You can open a quick help dialog here or submit any issues you find while using the graphl interface
- Add function button. For repetitive logic, you can add a function, this will add a new node that you can then reuse multiple times to execute that logic.
processScenefunction. Highlighted in blue when open. Click the arrow to the right to open.
TheprocessScenefunction is called once at the start to determine global export settings like the origin offset.processInstancefunction. Highlighted in blue when open. Click the arrow to the right to open.
TheprocessInstancefunction is called for each not-ignored instance of a mesh in the scene, and lets you customize it by e.g. overriding the material, clustering it, or processing the geometry.ignoreInstancefunction. Highlighted in blue when open. Click the arrow to the right to open.
TheignoreInstancefunction is called for each instance of a mesh in the scene before it is processed, and lets you specify whether you want to ignore it or continue processing it.- Add local variable button. You may add local variables to hold local state, and set their name and type here.
- Inputs and ouputs. You can only edit these for functions you created yourself. Fixed functions just list the uneditable inputs they provide and outputs they expect.
- The enter node. This is where the flow of the script starts.
- A NoClusterId node. This node says use the special cluster id that means the instance should not be merged into any cluster
- A Get Geometry node. This node just gets the input parameter "Geometry" so you don't need a long link
- A return node. This ends the script, outputting the inputs you specified
- Literal inputs. Some types you can just provide a value right in the node itself if you don't connect a node. This is called a "literal" value.
For example, booleans have a checkbox, strings and numbers can be typed in directly. - The Add node menu. You may right click the background to open the "add node menu". Then type to search for a node. Or use the arrow keys, tab, and enter to select a node type to spawn. Nodes are organized into categories.
Animation settings
You can use the properties of the ScheduleManager to control the animation, or bind its AnimationProgress property to a level sequence and use that to control the animation.
Watch the tutorial for more discussion.
Unreal Blueprint API
Get a reference to your Schedule Manager and drag and drop a link from it in the graph to open the node context menu. Search "Twin Sync Studio" there to see the list of applicable nodes provided by the Twin Sync Studio plugin, and to read their descriptions.